Trending
QUAINT BY NUMBERS: Let the countdown begin!
December, 2015
Advent calendars — besides being a genius excuse to eat chocolate every morning (for a month!), they’re also pretty fun to make. And so inexpensive. Most of ours were constructed from a single package of coordinating scrapbook papers and a brown paper bag—all of which we already had. The only real challenge? Not running out of chocolates. Sigh… Know your limit. DIY within it.
Cake Box Calendar
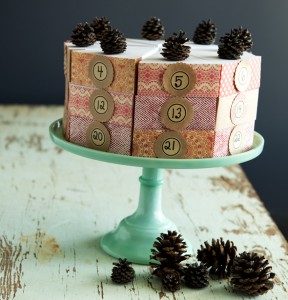 Materials: cake pedestal or large plate,
24 cake boxes, coordinating craft paper, 24 paper seals, 8 pinecones, scissors, glue, pen
- Construct your cake boxes, and place a treat inside each of them.
- Decorate the outside edge of each box with a strip of craft paper. We chose 4 different patters of paper, all from the same package of scrapbook paper.
- Cut out 24 circles to use as number tags, and glue a paper seal in the centre of each circle. Number them accordingly, from 1 to 24, and glue a number tag on each box.
- Arrange the boxes on your pedestal (3 rows of 8), and decorate the top of the “cake” with pinecones.
Mini-Muffin Calendar
Materials: mini-muffin pan, 24 treats, coordinating craft paper, 12 snowflake appliques, 24 paper seals, scissors, glue, pen
- Measure your muffin pan to determine what sized circles you’ll need to cover the muffin openings (the circles can touch each other but shouldn’t overlap).
- Cut out 24 circles. We chose 3 different patterns of paper and cut 8 circles from each.
- Glue a snowflake to the centre of 12 circles. Then glue a paper seal in the centre of each snowflake. Glue the remaining 12 seals on the remaining 12 circles.
- Number them accordingly, from 1 to 24.
- Place a treat in each muffin hole, and with a little glue, secure a circle over each opening.
Paper-Cone Advent Garland
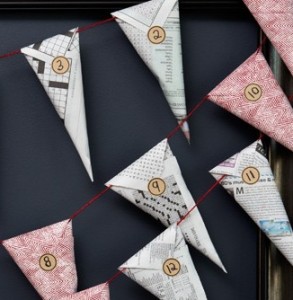 Materials: 24 squares of paper (approximately 7”x7”), 24 paper seals, tape, decorative string, pen
- Fold your squares of paper into cones, and tack the sides closed with tape (see image).
- Place a treat in each cone, and then fold down the top of each cone, leaving just enough space to thread your garland string through. Secure each cone closed with a paper seal, and number them accordingly, from 1 to 24.
- Thread the cones onto your string, and space them out evenly.
- Hang the garland in a zigzag across a window or in scallops along a mantle or shelf.
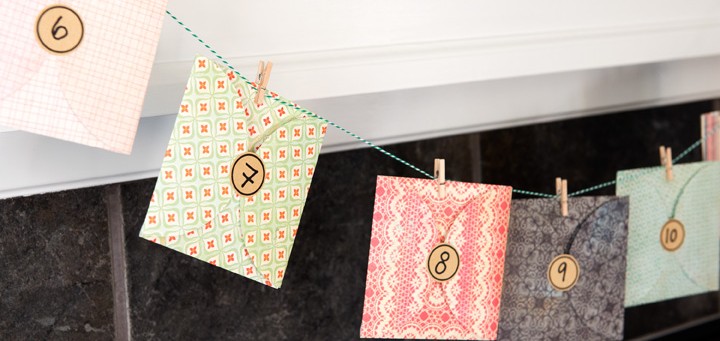
Love Letter Advent Calendar
Materials: 24 envelopes, 24 pieces of notepaper, 24 paper seals, decorative string, pen, 24 clothespins
- Write a special message on each piece of notepaper. Then place a message in each envelope, and secure each envelope closed with a paper seal.
- Number each envelope accordingly, from 1 to 24.
- Use clothespins to secure the envelopes to the decorative string, and hang the garland. t8n
Fold Your Own
Homemade envelopes are a cinch to make. Simply cut out four circles, and start folding.


More Trending

Join the T8N E-Newsletter