The 8s
Holiday Winter Planter: Deck the Halls - Create a holiday winter planter to dazzle up your doorway.
November, 2018
 The cold reality in Alberta is that we can’t enjoy our outdoor gardens with the ground frozen under several feet of snow. But winter doesn’t have to be a buzzkill for gardeners and plant lovers—‘tis the season for winter planters.
With boughs of cedar, pine cones, winter berries, and cheerful bows and ornaments, a winter planter is a fun and creative project that’s easy to do. Plus, it brings colour and life to your porch or front entry, brightening up the monochromatic winter landscape.
 We turned to Valerie Loseth at the Wheelbarrow Gardener and Florist for inspiration and how-to on creating a winter planter that comes alive with festive foliage.
A Few Ideas to Get You Started
- Be Creative with Containers. Nothing says ‘wow’ like a huge classic urn at the front door spilling beautiful decorated winter greenery. No space for a large urn? No problem. Put urns at either side of your garage door instead, or try
lining your steps with an assortment of small containers. Make an impression with containers that are quirky or
unexpected—think watering cans or vintage crates. - Hang It Up. Repurpose hanging baskets from summer. A charming look is to plant winter foliage in a collection of three baskets hung in a cluster at different lengths, or hang baskets in varying colours, sizes and shapes at welcoming points around your home.
- Go Foliage-Free. Try stacking a pile of wrapped gift boxes on top of a garden urn, or fill it with ornaments, red willow
branches, pine cones—or all of the above. - Let It Shine. Set your planted urn under an outdoor lantern so it glows long after the sun goes down. Or tuck
twinkling fairy lights into the foliage for a touch of magic.
 Steps for Creating Your Winter Planter
- Choose a decorative container. Consider where you want to place your planter and be sure your container will fit the space. Place a plastic container inside and fill it with floral foam. You can also cover it with chicken wire for stronger support.
- Fill in the back with cedar boughs. This is a good starting point to create some height. Next, insert a few boughs around the rim to cover the edges of the container. Then, start filling the centre with greens. Keep like or similar varieties together for a blocked look, or intermix foliage, branches, and other materials for a softer appearance.
- C
 ontinue building upwards and outwards. A typical arrangement has a variety of fillers, thrillers (this is the wow factor, usually accents), and spillers (foliage or other decorative elements that drape or ‘spill’ over the edge of the container. But it’s not a hard-and-fast rule—feel free to do what feels right and let your creativity guide you.
 - Layer in some decorative accents. Polish your creation with a bow, lights, or other finishing touches. Try pine cones or colourful ornaments for a festive look, or get creative with curly willow branches. t8n
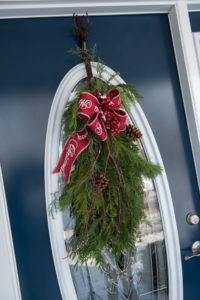
Tip: Don’t worry about getting all of your greenery into the planter, as the leftovers can be bundled together with florist wire and other decorative elements to create a door swag.
The Wheelbarrow Gardener and Florist will hold winter planter workshops on December 1 and 13.
Visit http://thewheelbarrowflorist.com for more on these and other events.


More The 8s


Join the T8N E-Newsletter