Online Content
Photographing the Night Sky: 10 tips for beginners
October, 2016
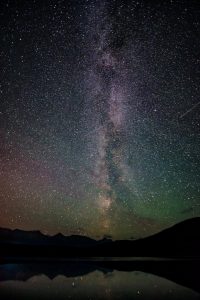
October is Dark Sky Month, so it’s a perfect time to take advantage of the longer hours of darkness to try night sky photography. If you’ve ever just wanted to tilt your camera towards the heavens and to capture the broad expanse of stars and the moon, then here are some basic tips to get you started.
- Camera
Memorize where everything is on your camera. It’ll take some time, but if you do this you’ll have less frustration when you’re taking a photo at night and you suddenly have to bring out your flashlight to locate the menu button. You can practice by blindfolding your eyes, going into a dark closet or just going outside at night with your camera.
- Research
Basic astronomy knowledge goes a long way. Get to know when constellations and planets appear, when the Milky Way is at its best and when different moon phases will be in the sky. This will help you find the right location and get the shot you want. Visit your local library for astronomy books, or go to edmontonrasc.com/observing/. Also, check when the skies are most active for night flight traffic. You can check Edmonton International Airport’s site for arrivals and departures (flyeia.com).
- Equipment
A wide-angle lens (24mm is a good, all-round lens) gives you a substantial amount of sky and a foreground in the frame. Most wide-angle lenses will have a wide-aperture capability of at least f/2.8, which will help in low light conditions and will give you less “noise” in your digital photos. Having a camera with manual control will help you with apertures, shutter speeds, ISO ratings, exposure times and focusing. Invest in a sturdy tripod; a solid, sure-locking, smooth controlled tripod makes all the difference in capturing a sharp photo. And, a cable release is recommended.
- Composition
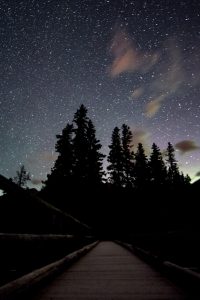
Photographs of just the stars will pretty much resemble all the others out there. Try to include foreground into your photo to add interest, for example a building, some trees, a mountain or a lake. Go out to your spot during the day and look for interesting elements to include in your photo. Mark your spot with a pile of rocks, or take a GPS co-ordinate to find the exact spot later in the dark. Another tip to keep in mind, take horizontal (landscape) and vertical (portrait) shots. You`ll be amazed at the difference a 90 degree turn of your camera will do for composition.
- Temperature
Depending on the time of year and location, you will have to deal with some cold temperatures. Batteries lose life quickly in cold temps, so keep them warm by putting them in case with disposable hand or foot warmers (HotHands or Grabber are two brands and can be found at any sporting store), or in your inside jacket pocket. Attach a hand warmer to your battery while it’s on your camera if it’s a really cold night. To prevent frost on your lens, use a lens hood. You can also wrap a foot/hand warmer around your lens. Keep a small red light (camera sensors aren’t able to see red light) with you so you can periodically check the lens for frost/dew; use a chamois to wipe away the moisture. Bring leg wraps for your tripod, a covering for your camera and warm clothes for you.
- Exposure
Photographing stars as specks of light: overexpose by one f-stop for whatever your light meter suggests; for example, if the meter says f/4, open up the aperture to f/2.8.
Photographing star trails: start with an aperture of f/4 with an ISO rating of 400 for half an hour.
Photographing circumpolar trails: start with an aperture of f/2.8, an ISO rating of 200 for up to two hours.
Photographing the full moon: start with a setting of f/8, an ISO rating of 100 and a shutter speed of anywhere between 1/125 and 1/60; however, if you’re using a long lens, due to the magnification you’ll have to increase your shutter speed so you don’t overexpose.
Photographing meteor showers: really long exposures don’t do well with this subject as anything over a minute will diminish their intensity and you won’t see anything. Anywhere from 15 to 30 seconds will be sufficient. Another tip is to take continuous shots with two to four seconds between each photo.
Photographing auroras: point your camera to the nearest polar region. Depending on intensity and how fast the auroras are moving will determine your exposure. For faint auroras, put your aperture to the widest setting with an ISO rating between 400 and 800 for ten seconds; intense auroras, stop down to f/2 to 4, increase your ISO to about 1600 to 2500 for 13 seconds. Slow moving auroras need an exposure of about 15 seconds, and fast ones keep it to about 10 seconds.
Photographing the Milky Way: set your aperture to f/1.4, your ISO to 3200 and expose for about 30 seconds.
Note: Try bracketing for the first little while so you can see what settings will give you the best exposures. Shoot your photos in RAW and not in JPEG. RAW format allow the colours can be adjusted to get true colours and not ruin the file; in JPEG, the recorded colour is part of the file information and can’t be altered.
- LCDs
Don’t trust the LCD at night as it misinterprets what you’ve just photographed. After about 30 minutes in the dark, your eyes have adjusted to night vision; any light will ruin this. Also, a bright LCD screen will make your photo appear correct, when in fact it’ll be underexposed. Before you head out, decrease the brightness of your LCD. If your camera has the ability, set the camera to tungsten or adjust the Kelvin (colour temperature) settings to find the hue that you like—a good rule of thumb is anywhere from 3200K to 4400K.
- Focus
Focusing is the hardest part of night sky photography as setting your lens to infinity won’t guarantee a sharp photo. Scout out your location in the daylight and focus on the most distant object in the direction you’ll be photographing that night. Tape the focus ring to the stable tube of the lens so there’ll be no movement. You can also use the moon as a guide. Switch off the auto-focus so it doesn’t suddenly focus on something else in the frame. You can also use the LCD screen in Live View: manually focus on a scene, magnify it by ten, find a bright star and use a photo/negative loupe to make sure that star is in focus—be careful not to scratch your LCD with the loupe.


More Online Content
Join the T8N E-Newsletter